About Haas AutomationFounded by Gene Haas in 1983, Haas Automation has always produced top-quality products at affordable prices. By relying on volume sales rather than per-unit profits to build the company, Haas Automation delivers more standard features, high-tech innovations, and rock-solid engineering than perhaps any other CNC manufacturer in the world – and at better prices! |
| About Haas |

The Industry's Most Thorough Testing Process
Before leaving the plant, the typical Haas CNC machine is subjected to more than 300 quality control tests, including up to 168 (24 x 7) hours of actual running time while in Assembly. In fact, whenever a machine is not physically being worked on, it is running pre-programmed tasks to check operational tolerances and performance parameters.
Quality control inspections follow each part from initial fabrication through subsequent installations. Static and operational testing continues as each component subassembly is added to the main assembly, providing a paper trail of certification through the entire assembly, testing, and shipping process.

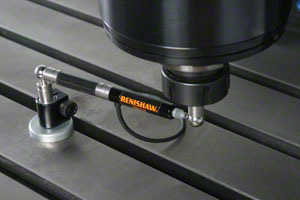
100% Ballbar Tested Before Shipping
Haas uses a state-of-the-art ballbar test to check the linear positioning and geometry of every machine. The ultra-precise ballbar tracks movement as the machine is put through a series of circular moves to certify synchronous movement and verify machine geometry. This generates a chart illustrating machine condition and performance data. Any deviations in geometry or position show up as distorted circles that are very easy to spot. A copy of this chart ships with each Haas machine as assurance that it is accurate and properly aligned.
